The art of organizing code

Writing optimised code isn't enough when other developers are involved, or if you plan to work on the codebase over a long period. I understand that organizing code can be a matter of opinion, and there’s plenty of advice online but hear me out on this.
I’ve been writing code professionally for years and, in parallel, building several side projects on my own for fun and profit. I realized the importance of organizing code when I returned to side projects that I hadn’t touched in months. Whenever I needed to modify functionality or fix a bug, it would take me a long time to navigate and edit my own code, and I couldn’t believe that I wrote such code in the first place. You know the pain if you’ve ever worked on someone else’s poorly written codebase.

Side note about Competitive Programming:
Devs who participate or have participated in competitive programming are even more prone to this (PS: I used to participate in CP). In CP culture, code structure doesn’t matter—only performance does. But that’s not how things work when building actual products. You don’t just submit your code and never touch it again. It’s not just between you and the compiler; other developers need to understand your code too.
After working on various codebases irregularly, I've developed a fair understanding of effective code organization. The key is to think from a business flow perspective and then write code accordingly.
I’ll explain this with two examples, one for the backend and one for the frontend.
Organizing Backend Code
Let’s say you're working on an AI chat app and need to write an API that returns an AI response for a user’s prompt. Can you organize this API into different parts?
Here’s my approach:
function GenerateAiResponse() {

	// Step 1: Write all code related to authenticating the user in this function.
	// This function can be further divided if needed.
	authenticateUser()

	// Step 2: Perform validations: Is the request data valid? Is the user authorized to get a response? Is the quota over?
	// This function can also be further divided.
	handleValidations()

	// All checks are done at this point. Proceed to the next step.

	// Step 3: All logic for generating a response should be inside this function.
	// This function can be further divided if needed.
	generateAiResponse()
}

// details omitted for brevity
You’ll notice we’ve organized the code into three main parts, making it easier for you and other devs to navigate. If a dev needs to add a new validation, they can go into handleValidations() and make the changes there. If there’s a new change in how the AI response is generated, they can go into generateAiResponse() and modify it.
Now, imagine if there were no such breakdown and everything was in one giant function. It would be much harder to navigate and find the right spot to make a change. Worse yet, if the code is nonlinear—where some validation happens at the beginning and some just before making the final API call—it becomes a nightmare to manage and could possibly introduce new bugs after making any changes.
Organizing Frontend Code
Organizing frontend code is often easier because we have a reference in the UI. You should organize your code into components that represent different UI states. There should be a separate component representing each UI state.
You can visualize it as a Finite State Machine:
A Finite State Machine (FSM) is a way to show something that has a few fixed states and changes between them based on inputs or actions.
Let’s suppose you want to build the UI for the email verification flow when a user signs up via email.
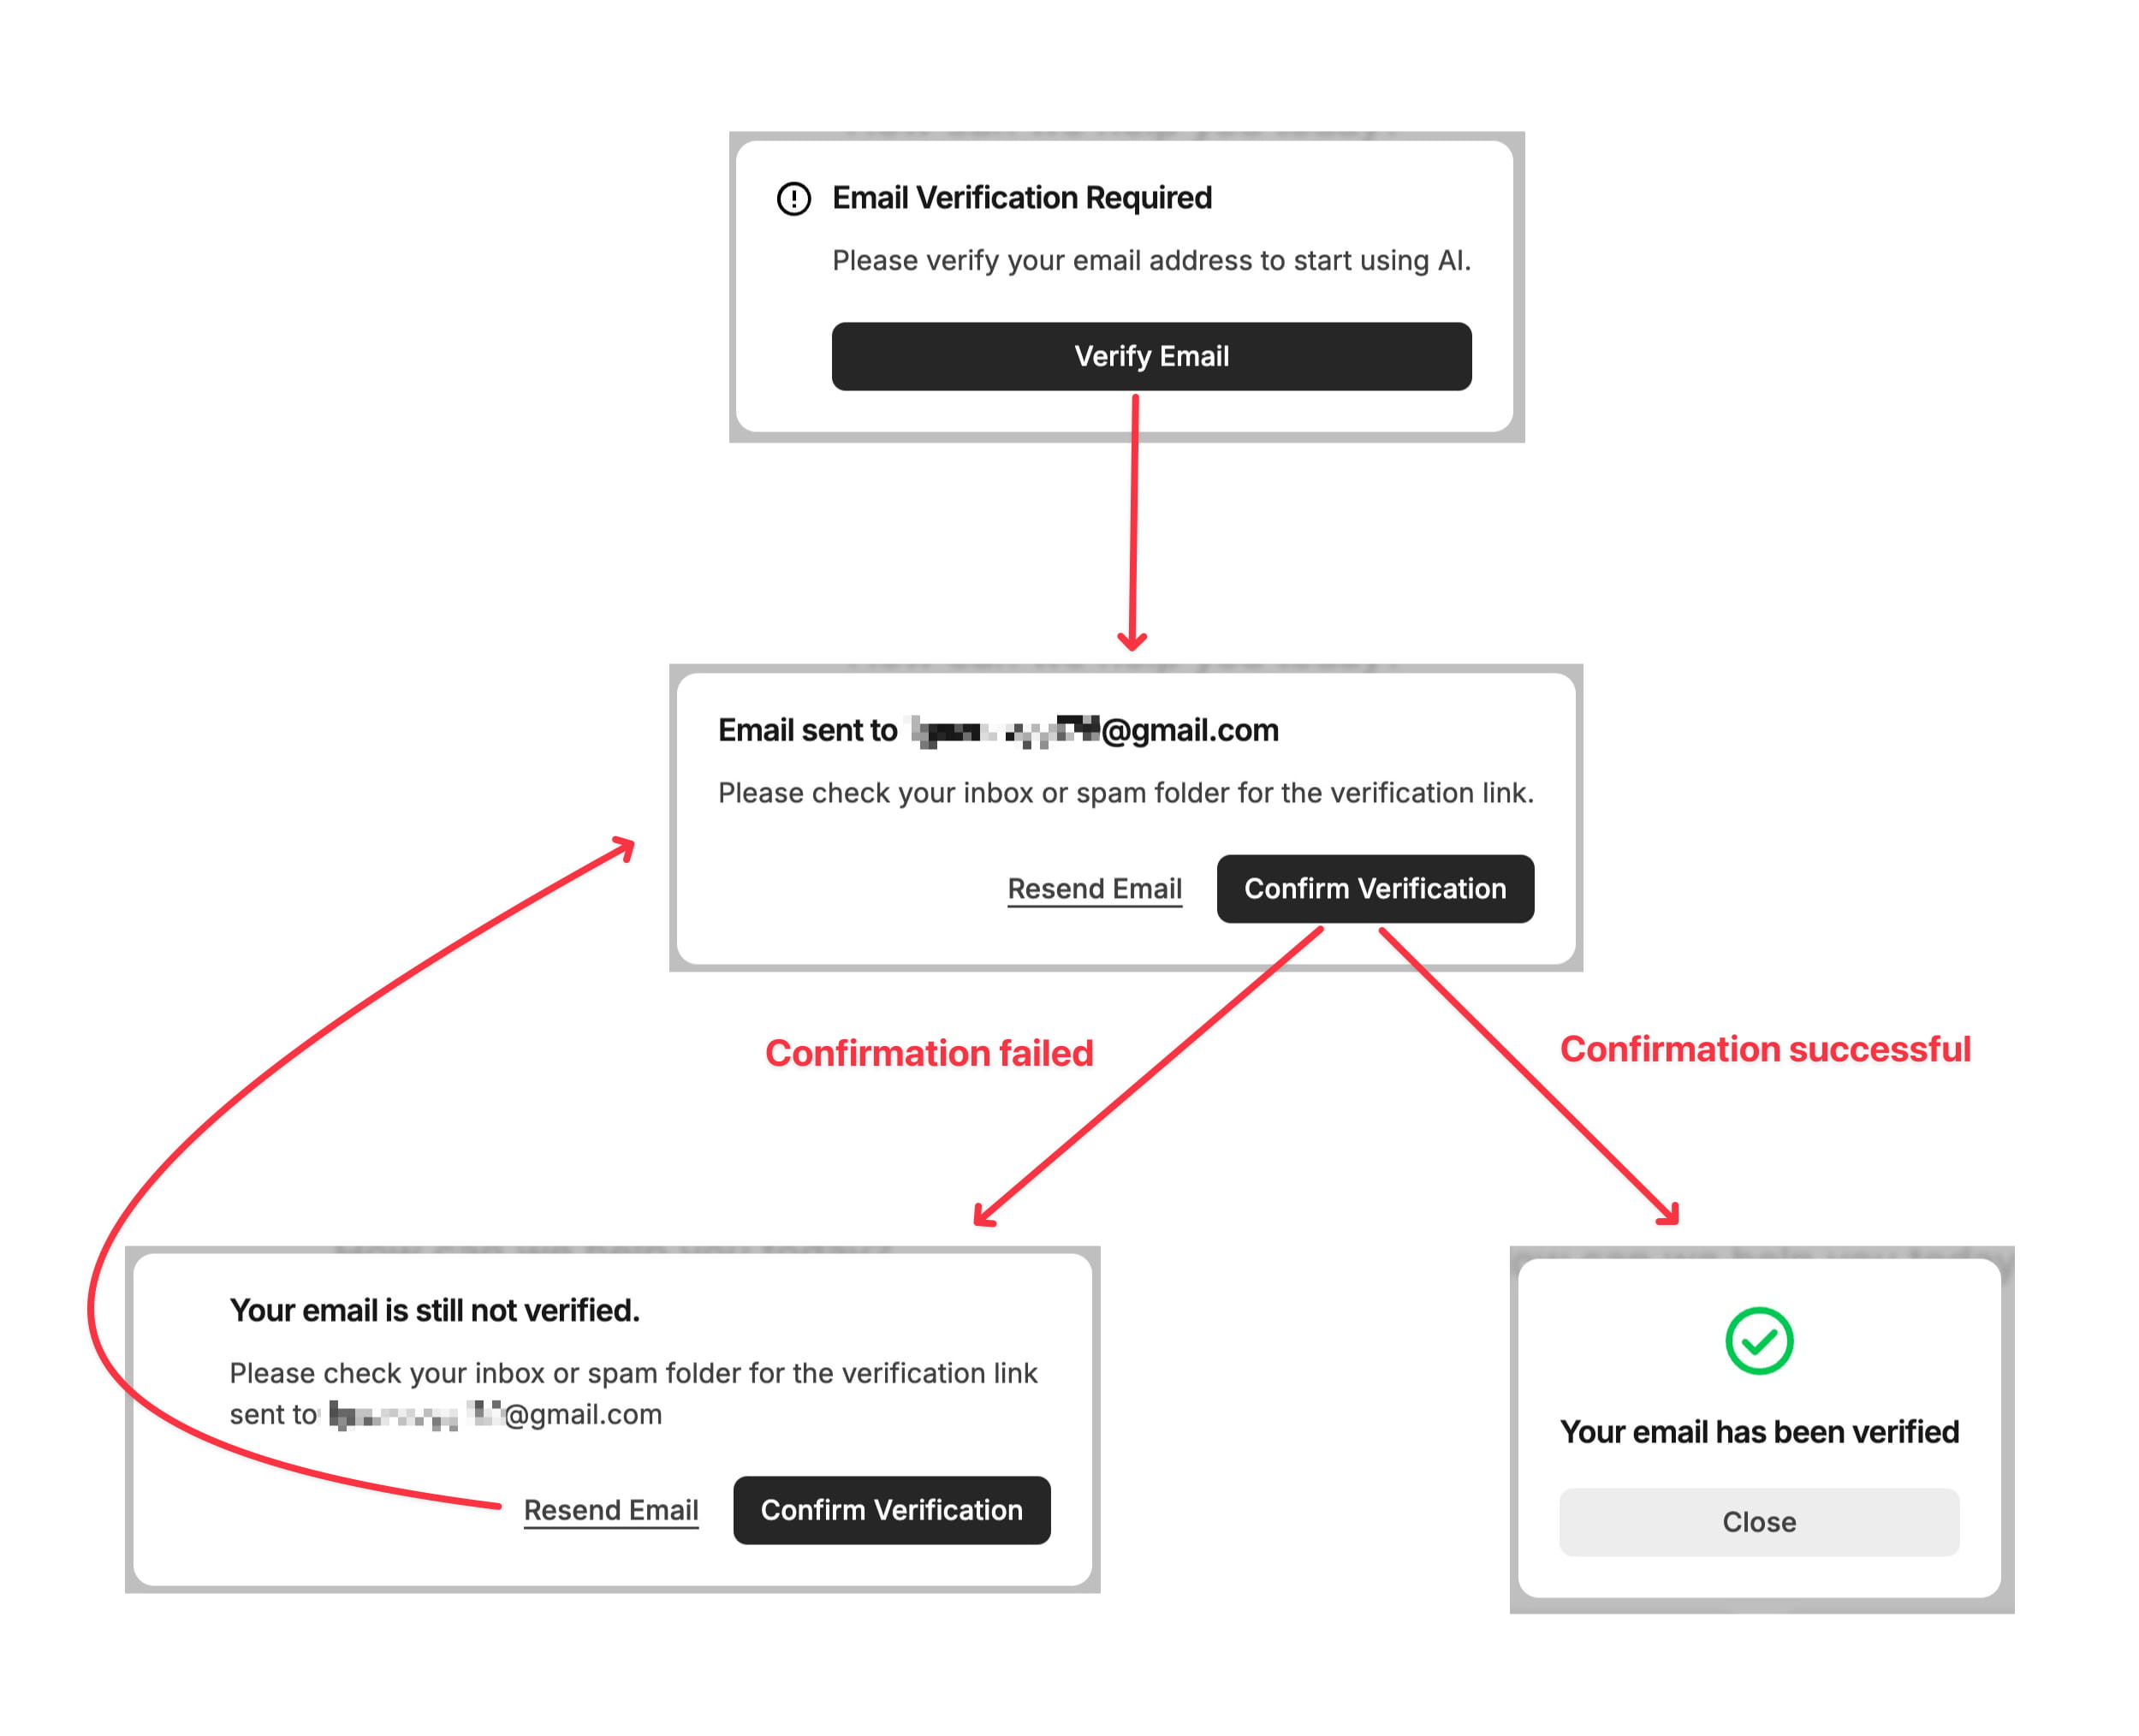
There are different UI states in the flow, so I’ve created separate components for each state.
// This is the main component. All other components representing different UI states should be inside it.
// Of course, only one component is shown to the user based on the current UI state.
<EmailVerificationMainComponent/>

// Below are the 4 components for the 4 different UI states.

// 1. This popup is shown after the user signs up with their email. There's a button to send the verification email.
<VerifyYourEmail/>

// 2. This popup is shown when the user clicks on the 'Verify Email' button.
// It has two buttons: one to confirm verification and the other to resend the email.
<VerificationEmailSentConfirmVerification/>

// 3. This popup is shown when the user clicks on 'Confirm Verification' but the email is still not verified.
// It has the same two buttons as the previous popup, which should be extracted into subcomponents for reusability.
<EmailStillNotVerifiedConfirmVerification/>

// 4. This popup is shown when the user clicks 'Confirm Verification' and the verification succeeds.
<EmailVerificationSuccessful/>

// Note: above components can be further divided into smaller components.
Common mistake:
You might have noticed that the only difference between VerificationEmailSentConfirmVerification and EmailStillNotVerifiedConfirmVerification UI state is the text in the title and description. You might feel tempted to optimize and combine these two components into one, showing the correct text based on the current state like below:
// Incorrectly organized code:

<VerifyYourEmail/>
<ConfirmVerification/>
<EmailVerificationSuccessful/>

// Rough implementation
function ConfirmVerification() {
    if(isEmailSent) {
        title = 'Email sent to xxx@gmail.com';
        description = 'Please check your inbox or spam folder for the verification link.';
    } else if(isVerificationFailed) {
        title = 'Your email is still not verified.';
        description = 'Please check your inbox or spam folder for the verification link sent to xxx@gmail.com';
    }

    // A subcomponent that renders the popup with the provided title, description, and two buttons.
    return <VerificationPopup title={title} description={description} />;
}
The above code may look okay, but it's not well-organized. That’s because there’s no 1:1 mapping between the UI states and the components. There are 4 UI states, but only 3 components. Now, if there’s a new requirement to show a “Contact Support” button beside the “Resend Email” button when email verification fails, implementing that will not be straightforward and make the code even less organised than before.
In the previous approach, where the components were 1:1 mapped, the “Contact Support” button could simply be added to the EmailStillNotVerifiedConfirmVerification component, and the code would remain organized.
Organizing backend code according to business logic or organizing frontend code into components based on different UI states will lead to more lines of code. But that’s okay. Even though the code may be longer, it will be much easier for you and others to understand and navigate.
File Structure
Organizing code into different functions is not enough. The code should also be organized into different folders and files. For backend development, structure it according to the business logic. For frontend, you can break down the main UI into different sections and organize each section into its own folder. A section may also have sub-parts, which can be structured as subfolders.
For example, consider a user's account page with sections like user profile information, current plan details, and actions like managing the plan or changing the password. Here's a general layout of the account page:
https://chatgptwriter.ai/account

Navbar
User Profile
Current Plan (shows current plan details with a button to manage the plan)
Contact Support
Change Password Button
Delete Account Button
Here's the file structure with an explanation:
/account/
├── navbar/
│   ├── index.tsx # index file is the main navbar component for the account page
│   ├── utils.ts # Related TypeScript code and constants
│   └── components.tsx # Related subcomponents
├── profile/
│   ├── index.tsx
│   └── utils.ts
├── currentPlan/
│   ├── index.tsx
│   ├── utils.ts
│   ├── components.tsx
│   └── managePlan/ # Subfolder for further organization
│       ├── cancelPlan.tsx
│       └── upgradePlan.tsx
├── support/
│   └── index.tsx
├── changePassword/
│   ├── index.tsx
│   └── components.tsx
└── deleteAccount/
    ├── index.tsx
    └── components.tsx
I've organized the code by creating separate folders for each section and action. All related code is placed within these folders. Additionally, there's a subfolder named managePlan/ inside the currentPlan/ folder, specifically for the “Manage Plan” button located in the “Current Plan” section.
While a folder can contain several files, only one main component should be linked to the account page for rendering. For example, only one call is made to render the navbar, profile, current plan, etc. Here's a rough example:
export function Account() {
  return (
    <>
      <Navbar />
      <Profile />
      <CurrentPlan />
      <Support />
      <ChangePassword />
      <DeleteAccount />
    </>
  );
}
Each section and action of the page is in separate, isolated containers (folders). The benefits of this approach are:
- Easy to relocate: If a section or action needs to be moved to another page, you can simply unlink the main component, move the folder, and link the component to its new location.
- Easy to navigate: If you need to modify a component, it's easy to find and navigate through the organized folder structure.
- Easy to remove: If a component needs to be completely removed, just unlink the component from the page and delete the folder.
Note: It is recommended to create a folder for each section of the main UI. However, for any sub-section with a short implementation, you can keep it in a single file instead of creating a separate folder, as I did with cancelPlan.tsx and upgradePlan.tsx.
Some Notes:
- A good developer knows when to make exceptions to rules or guidelines.
- Code should also be linear (one-directional top-down flow) for even better readability. Learn more about linear code in my article.